
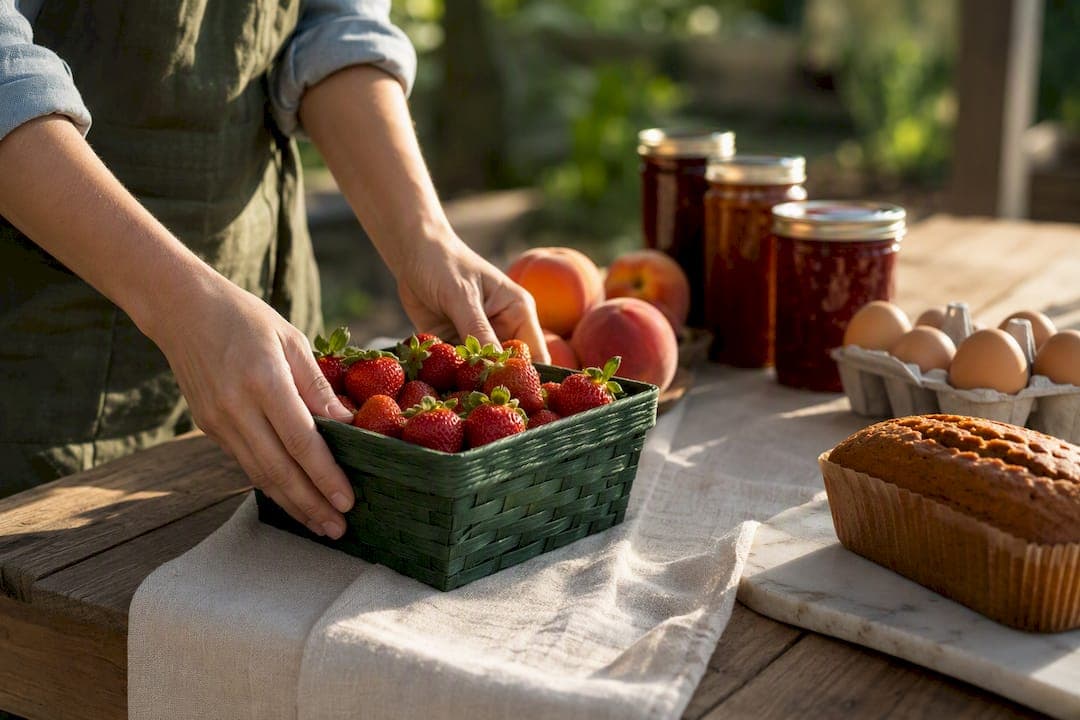
Seasonal product planning starts with the saleable unit, not the seed packet: decide exactly what you're selling, in what pack size, by what date, before you plant or bake anything. Pick 3 to 5 seasonal hero items per quarter so quality and workload stay manageable instead of scattering effort across a dozen half-finished ideas. Everything else, planting schedules, ingredient orders, pre-order windows, flows from that one decision.
TL;DR:
- Producers should define their saleable units and demand categories, tailoring production to committed, probable, and speculative demand for accurate planning.
- Work backward from sales targets to determine planting or production volume, incorporating yield estimates, pack-out loss allowances, and labor costs.
- Stagger sowing dates for short-season crops and adjust succession intervals based on changing daylight and temperature to maintain steady harvests.
- Lock in lead times for seed, ingredients, packaging, and recipe testing well before planned market or launch dates to prevent delays.
- Treat seasonal product launches like marketing campaigns, using pre-orders and scarcity tactics to build excitement and minimize risk.
Table of Contents
- What Does Seasonal Product Planning Actually Mean for Small Producers?
- Step 5: Launch Seasonal Drops Like Real Product Launches
- Applying This on Harvest Hub: A Real Example
- Open a Digital Farm Stand Built for Seasonal Drops
- Sources
What Does Seasonal Product Planning Actually Mean for Small Producers?
Seasonal product planning, sometimes called seasonal merchandising or product lifecycle management in retail circles, means something different for a market gardener or home baker than it does for a grocery chain. You're not forecasting shelf space across 200 stores. You're deciding how many jars of strawberry jam to make in June, how many dozen eggs your flock will produce by the fall market, and when to open pre-orders for pumpkin bread before Halloween. The mechanics are the same: define demand, size production, set a timeline, launch, review. The scale and stakes are just human-sized.
Step 1: Define Saleable Units and Pick Your Channels
Before you plant a single seed, decide what a customer actually buys. A "saleable unit" is the exact thing on your price list: a pint of cherry tomatoes, a dozen eggs, a 12-ounce jar of dilly beans, a loaf of sourdough. Vague plans like "grow tomatoes" fail because they don't tell you how many plants, how much labor, or how much shelf space you need. Working backward from real market demand instead of the seed catalog is the single habit that separates producers who sell out from producers who compost half their harvest.
Once the unit is defined, sort your expected sales into three buckets:
- Committed demand — pre-orders, CSA subscriptions, and standing wholesale contracts you can count on.
- Probable demand — repeat customers and market regulars based on last season's numbers.
- Speculative demand — new customers, impulse buys, or a product you're testing for the first time.
Channel changes the math. A farmers market rewards volume and visual appeal on a fixed weekly cadence. Online pre-orders through a marketplace let you cap production to actual orders, which is safer for anything with a short shelf life. Wholesale accounts usually want consistent pack-outs on a set delivery day, so a restaurant order for 20 pounds of mixed greens every Tuesday behaves nothing like a Saturday market table.
Step 2: Calculate How Much to Plant or Produce
Work backward from the sale, not forward from the seed bag. Say you want 300 pounds of tomatoes to sell at $4 a pound across eight market Saturdays. That's your saleable target. Now build the math in reverse:
- Estimate marketable yield per plant (extension data often cites 8 to 12 pounds per indeterminate tomato plant under good conditions, but your own records beat a generic average every time).
- Apply a pack-out loss allowance, typically 10 to 20% for culls, cracking, or pest damage, to figure out how much you need to grow versus how much you need to sell.
- Divide the adjusted total by expected yield per plant to get your plant count, then add a buffer for germination failure or transplant shock.
Germination rates, pest pressure, and weather all eat into that raw number, so conservative growers round up on seed orders and plant count, not down. The University of Minnesota Extension's crop and field planning tools offer days-to-maturity and yield tables that work well as a starting point, but nothing replaces your own harvest logs once you have a season or two on record.
Pro Tip: Don't forget labor and post-harvest handling in your cost math. A lot of growers price a crop based on seed cost alone and forget that washing, packing, and hauling 300 pounds of tomatoes takes real hours that have to show up somewhere in the price.
Once you know your unit cost, Harvest Hub's guide to pricing farm produce walks through setting a saleable-unit price that actually covers those hidden hours.
Step 3: Schedule Succession Plantings to Avoid Feast or Famine
Nothing wastes a harvest faster than 40 pounds of lettuce ready on the same Tuesday nobody's buying lettuce. Succession planting, staggering sowing dates for the same crop, is how market gardeners smooth that curve. For short-season crops maturing in under 60 days, planting every 7 to 14 days keeps a steady trickle of product instead of one overwhelming spike.
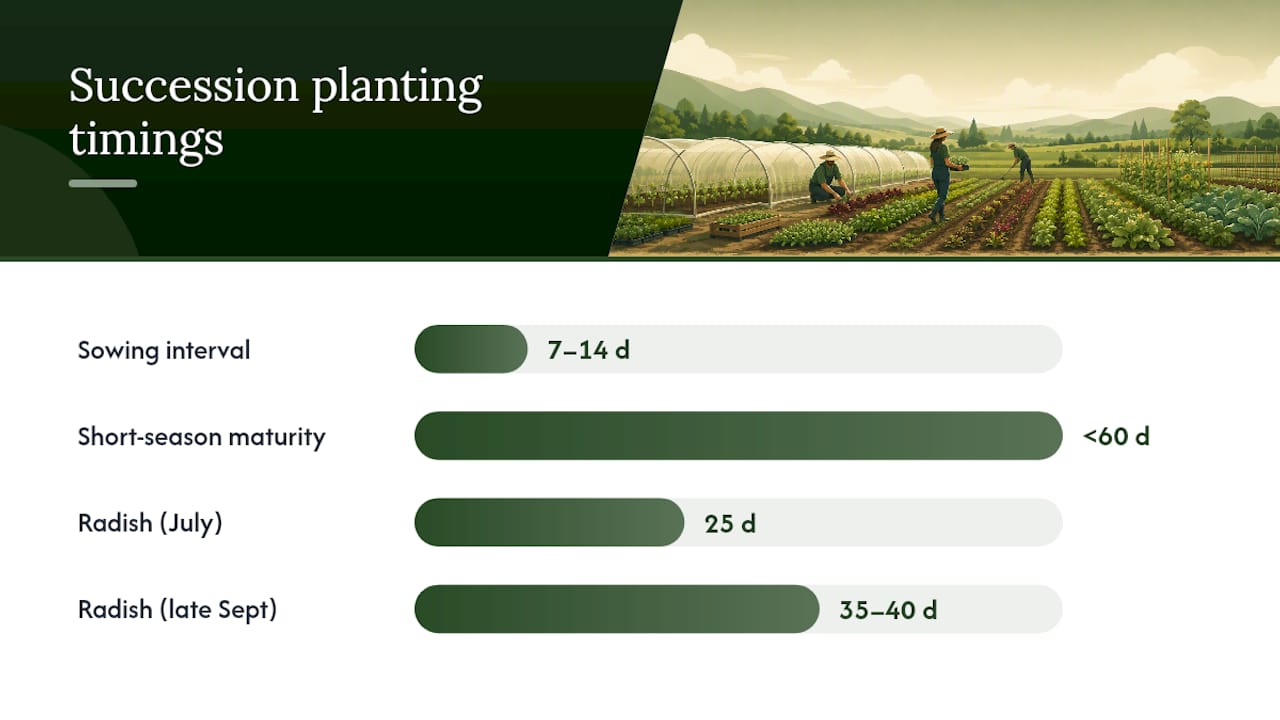
That interval isn't fixed all season, though. As daylight shortens heading into fall, the same crop takes noticeably longer to mature, a phenomenon called the Persephone period. A radish that finishes in 25 days in July might need 35 to 40 days in late September, so your succession intervals need to stretch as the calendar turns.
A few habits make this manageable:
- Map sowing, transplant, and harvest dates on a simple spreadsheet or graph so overlapping labor peaks show up before they hit you.
- Calculate your last sowing date by counting backward from first frost using the crop's days-to-maturity, then padding a week for cooler-season slowdown.
- Check your plan against real frost data for your zone rather than a generic regional average.
Pro Tip: Adapting the NCAT succession planting spreadsheet is faster than building your own from scratch, and it's built specifically to handle staggered plantings across different USDA zones.
Step 4: Map Your Lead Times Before You Need the Product
A perfect production plan falls apart if the packaging shows up two weeks late. Lock in these lead times before you commit to a launch date:
- Seed and plug orders: many popular varieties sell out by late winter, so order 2 to 3 months ahead of your target sowing date.
- Specialty ingredients (vanilla, specialty flours, unusual spices): 3 to 6 weeks, longer around holidays when suppliers get backed up.
- Packaging and labels: custom printed labels can take 2 to 4 weeks; always order more than you think you need.
- Recipe testing: budget at least a week per new recipe to nail ratios and shelf stability before a real launch.
Bakeries face a different clock than growers. Flavor decisions should happen months ahead, but the actual marketing and production push works best on a 6 to 8 week cadence before peak demand, since that's roughly how long it takes to build buzz and lock ingredient orders. A backward calendar might read: market date November 15 → bake day November 13 → specialty ingredient arrival November 1 → recipe testing complete October 20. If you're changing ingredients on a cottage-food product, double check your state's cottage-food labeling rules before you print a single label.
Step 5: Launch Seasonal Drops Like Real Product Launches
Treat a seasonal item as a launch, not just a restock. Scarcity and timing sell products, and small producers who lean into that outperform the ones who just quietly put jam on a shelf.
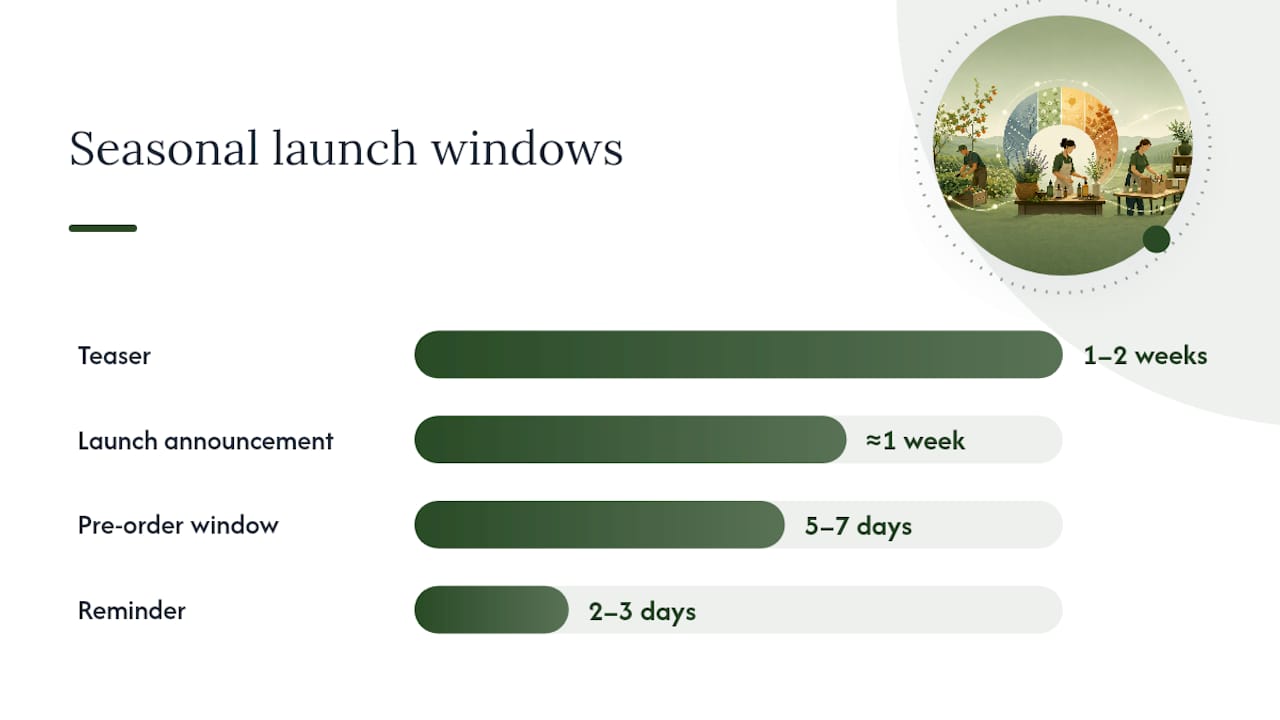
- Teaser (1 to 2 weeks out): a photo of the crop coming ripe, or a "first batch of the season" hint.
- Launch announcement (about 1 week before): open date, quantity, and how to order.
- Reminder (2 to 3 days before): a nudge for anyone who saw the teaser but hasn't ordered.
Pre-orders reduce your risk directly, because you're baking or harvesting against confirmed demand instead of a guess. Opening a pre-order window for 5 to 7 days usually gives enough lead time to size the batch without losing the urgency that drives people to actually order.
Story matters here too. A jar of peach preserves made from fruit grown two counties over sells at a premium a supermarket version never could, because the story is verifiable and local. Price to cover that premium honestly: ingredient cost, packaging, your labor, and a bit extra for the fact that this batch won't exist again until next August.
Pro Tip: Honest scarcity works. If you really are only making 40 jars, say so. Manufactured urgency erodes trust fast in a community marketplace where buyers can see your other listings.
Step 6: Build in Season-Extension and Plan B Options
Weather doesn't ask permission before it ruins a harvest window. A hoophouse or low tunnel can add several weeks of production on either end of the season, often paying for itself within a year or two for a producer selling weekly at market. Rowcover is cheaper and faster to deploy for a single frost scare, though it buys days, not weeks.
When a crop fails or falls behind schedule, quick-turn options like radishes, baby greens, or scallions can fill a market table gap in as little as 25 to 35 days. Your actual Plan B checklist:
- Buy from a neighboring producer to cover a gap without disappointing regular customers.
- Preserve or process surplus from a strong week to sell during a weak one.
- Swap in a substitute product rather than leaving a hole in your lineup.
Invest in season-extension gear when the shortfall repeats year after year. Accept the occasional gap when it's a one-off weather event.
Step 7: Keep Records and Review Every Season
The plan gets easier every year you track real numbers instead of guessing. At minimum, log actual yields, pack-out percentage, harvest dates, labor hours, sales per market day, and pre-order counts against what you predicted.
- Check weekly during the season: are sales tracking with the pre-order estimate, or drifting?
- Run an end-of-season review: what sold out early, what sat unsold, where did labor spike?
- Test small before scaling. One or two succession plantings validate your yield assumptions before you commit a whole season's plant budget to them.
Harvest Hub's review and relisting tools capture buyer feedback automatically, so the notes you'd normally scribble on a clipboard are already sitting in your seller dashboard next January.
Applying This on Harvest Hub: A Real Example
Cool Spring Farm LLC used exactly this sequence for a fall pumpkin drop, restock notifications alerted buyers the moment a new batch listed, and their verified profile meant no explaining themselves to first-time customers. If you've been putting off testing a seasonal drop, pick one product and run these seven steps this quarter.
— Sheldon
Open a Digital Farm Stand Built for Seasonal Drops
Harvest Hub gives you the pre-order and restock tools this whole playbook depends on, without the calendar juggling of running your own website or relying on a single Saturday market to move a season's harvest. Your digital farm stand stays open every day, so a pre-order window you set for a 6 to 8 week bakery cadence or a 7 day produce drop runs itself while you're busy actually harvesting or baking.
Verified profiles and real reviews mean new customers trust your first batch of the season without you having to convince them in person. Restock notifications tell buyers the moment your next succession planting hits the digital shelf, and transparent pricing tools help you set a fair number that covers the ingredient premium and packaging you budgeted for in Step 4. Browse examples like Sweet Home Meats, LLC to see how other producers structure their seasonal listings, then open your own farm stand and publish your next seasonal drop before the window closes.
Sources
- Succession planting for an extended harvest
- Crop and field planning tools for vegetable farmers
- Succession planting and continuous harvest (NCAT)
- Seasonal flavor forecasting for bakery menu planning